# React
# state 和 setState
# 为什么要 setState,而不是直接 this.state.xx = oo
setState做的事情不仅仅只是修改了this.state的值,另外最重要的是它会触发React的更新机制,会进行diff,然后将patch部分更新到真实dom里。
# setState是同步还是异步相关问题
- setState 是同步还是异步?
执行过程代码同步的,只是合成事件和钩子函数的调用顺序在更新之前,导致在合成事件和钩子函数中没法立马拿到更新后的值,形式了所谓的“异步”,所以表现出来有时是同步,有时是“异步”。
- 何时是同步,何时是异步呢?
只在合成事件和钩子函数中是“异步”的,在原生事件和 setTimeout/setInterval等原生 API 中都是同步的。简单的可以理解为被 React 控制的函数里面就会表现出“异步”,反之表现为同步。
- 那为什么会出现异步的情况呢?
为了做性能优化,将 state 的更新延缓到最后批量合并再去渲染对于应用的性能优化是有极大好处的,如果每次的状态改变都去重新渲染真实 dom,那么它将带来巨大的性能消耗。
- 那如何在表现出异步的函数里可以准确拿到更新后的 state 呢?
通过第二个参数 setState(partialState, callback) 中的 callback 拿到更新后的结果。 或者可以通过给 setState 传递函数来表现出同步的情况:
this.setState({count: 1}, () => {})

this.setState((state) => {
    return { val: newVal }
})
2
3
4
5
- 那表现出异步的原理是怎么样的呢?
可以看这篇文章:你真的理解setState吗?。
我这里还是用最简单的语言让你理解:
在 React 的 setState 函数实现中,会根据 isBatchingUpdates(默认是 false) 变量判断是否直接更新 this.state 还是放到队列中稍后更新。然后有一个 batchedUpdate 函数,可以修改 isBatchingUpdates 为 true,当 React 调用事件处理函数之前,或者生命周期函数之前就会调用 batchedUpdate 函数,这样的话,setState 就不会同步更新 this.state,而是放到更新队列里面后续更新。
这样你就可以理解为什么原生事件和 setTimeout/setinterval 里面调用 this.state 会同步更新了吧,因为通过这些函数调用的 React 没办法去调用 batchedUpdate 函数将 isBatchingUpdates 设置为 true,那么这个时候 setState 的时候默认就是 false,那么就会同步更新。
# props 和 props.children
this.props.children 表示组件下面所有的子节点。当没有的时候显示 undefined 当有一个的时候显示为类型 object 当有多个的时候显示为数组 array。
React.Children.map 来遍历子节点,不用担心数据类型。
# 生命周期
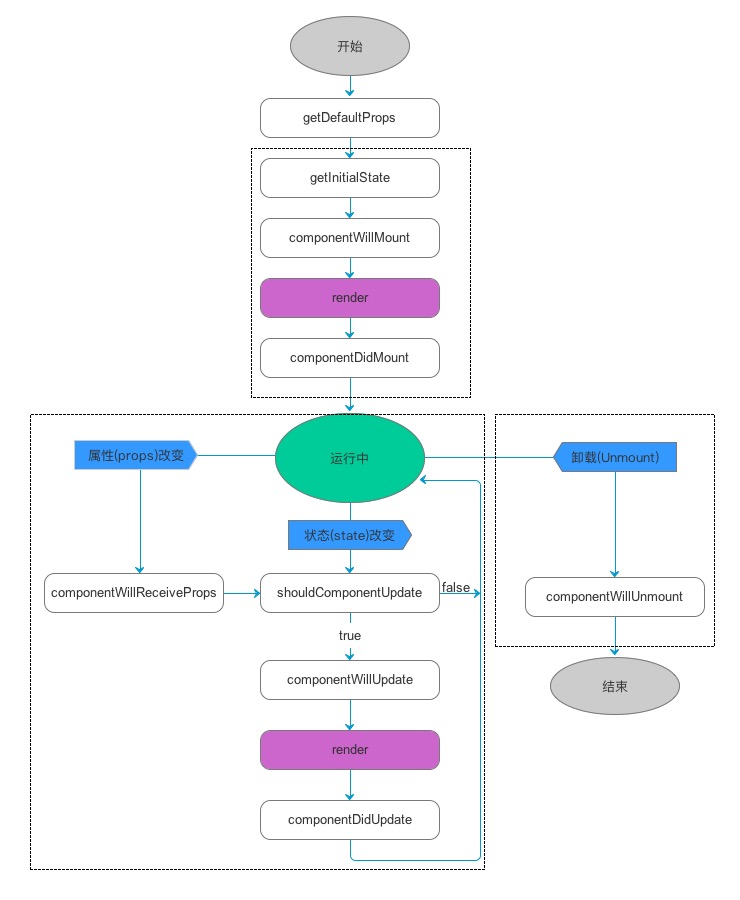
# 原生命周期

# initialization 阶段
- constructor
- super(props)用来调用基类的构造方法( constructor() ), 也将父组件的props注入给子组件,功子组件读取(组件中props只读不可变,state可变)。
# Mounting(挂载)阶段
componentWillMount(nextProps, nextState)- 在组件挂载到DOM前调用,且只会被调用一次,在这边调用this.setState不会引起组件重新渲染,也可以把写在这边的内容提前到constructor()中,所以项目中很少用。
- 无法保证在
componentWillUnmount中取消掉相应的事件订阅,或者导致多次重复获取异步数据等问题
render- 根据组件的props和state(无两者的重传递和重赋值,论值是否有变化,都可以引起组件重新render) ,return 一个React元素(描述组件,即UI),不负责组件实际渲染工作,之后由React自身根据此元素去渲染出页面DOM。render是纯函数(Pure function:函数的返回结果只依赖于它的参数;函数执行过程里面没有副作用),不能在里面执行this.setState,会有改变组件状态的副作用。
componentDidMount- 组件挂载到DOM后调用,且只会被调用一次
# update 阶段
componentWillReceiveProps(nextProps)- 此方法只调用于props引起的组件更新过程中,响应 Props 变化之后进行更新的唯一方式,参数nextProps是父组件传给当前组件的新props。但父组件render方法的调用不能保证重传给当前组件的props是有变化的,所以在此方法中根据nextProps和this.props来查明重传的props是否改变,以及如果改变了要执行啥,比如根据新的props调用this.setState出发当前组件的重新render
shouldComponentUpdate- 此方法通过比较nextProps,nextState及当前组件的this.props,this.state,返回true时当前组件将继续执行更新过程,返回false则当前组件更新停止,以此可用来减少组件的不必要渲染,优化组件性能。
componentWillUpdate(nextProps, nextState)re-render问题,并且对DOM的更新操作也可能导致重新渲染
rendercomponentDidUpdate(prevProps, prevState)
# 卸载阶段
componentWillunMount
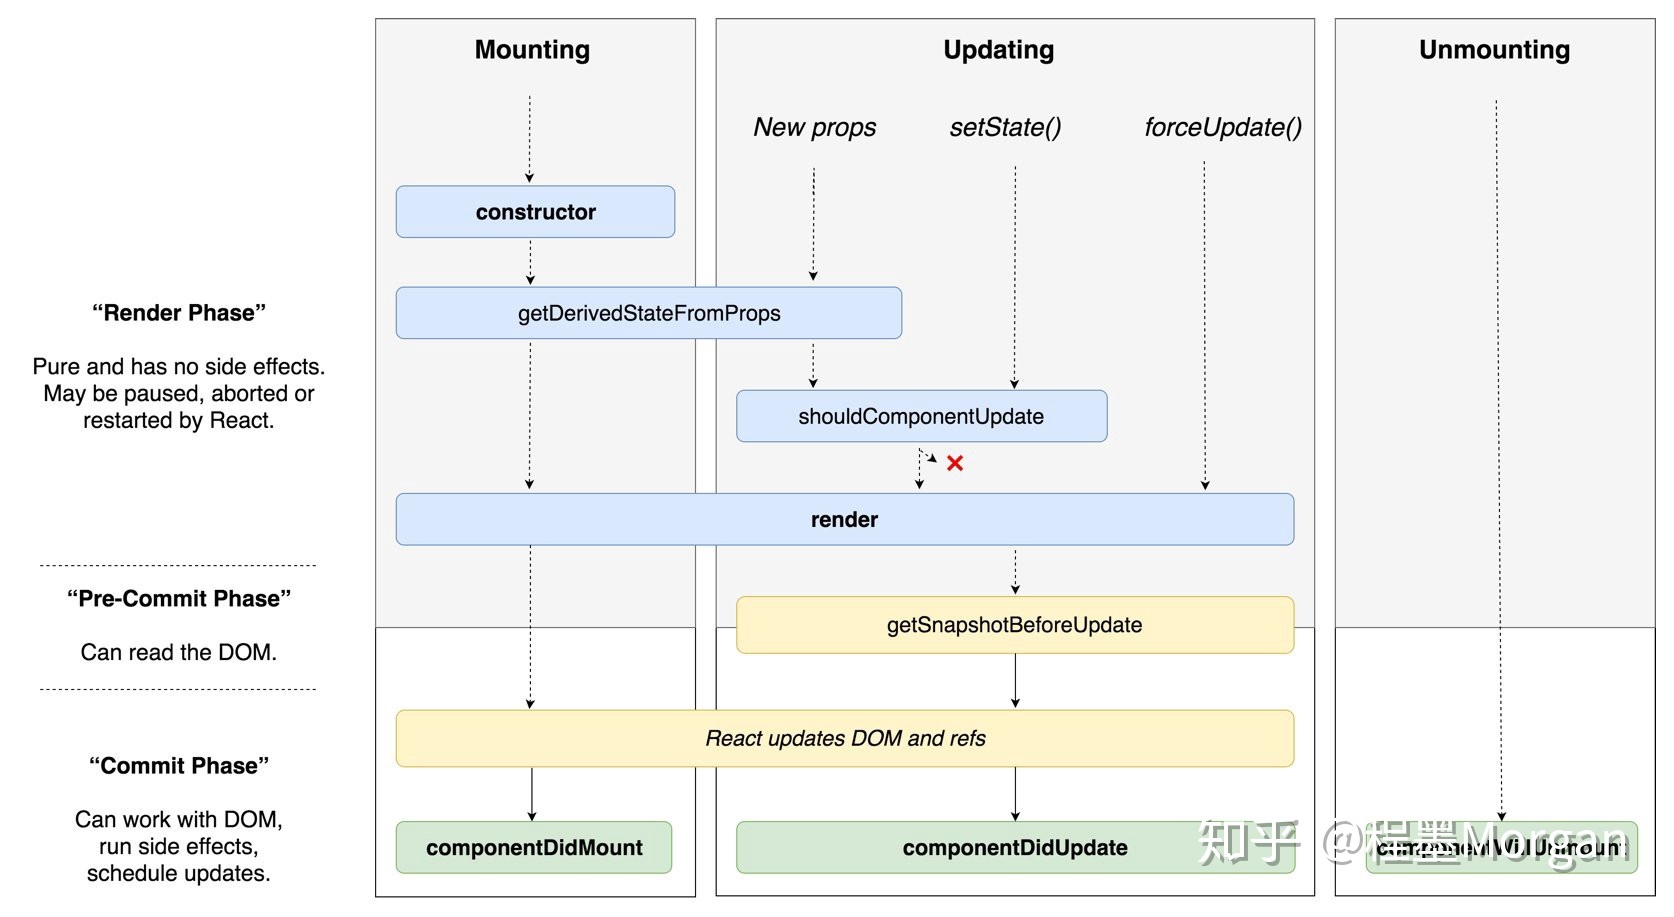
# 新生命周期
getDerivedStateFromProps
顾名思义从 props 获取派生的 state 。可以查看这里了解更多React 中 getDerivedStateFromProps 的用法和反模式
getDerivedStateFromProps(nextProps, prevState)
class ColorPicker extends React.Component {
    state = {
        color: '#000000',
        prevPropColor: ''
    }
    static getDerivedStateFromProps (props, state) {
        if (props.color !== state.prevPropColor) {
            return {
                color: props.color
                prevPropColor: props.color
            }
        }
        return null
    }
    ... // 选择颜色方法
    render () {
        ... // 显示颜色和选择颜色操作
    }
}
2
3
4
5
6
7
8
9
10
11
12
13
14
15
16
17
18
19
getSnapshotBeforeUpdate
getSnapshotBeforeUpdate(prevProps, prevState)
componentDidCatch
componentDidCatch(error, info)

# ref
createRefforwardRef
# 高阶组件(HOC)
高阶组件(HOC,Higher-Order Components)不是组件,而是一个函数,关于其原理的详细说明查看官方文档,它会接收一个组件作为参数并返回一个经过改造的新组件:
const EnhancedComponent = higherOrderComponent(WrappedComponent);
# 代理方式的高阶组件
作用:操纵props、访问ref、抽取状态、包装组件
export default () => WrapperComponent => class A extends Component {
  render () {
    const {...otherProps} = this.props;
    return <WrapperComponent {...otherProps}></WrapperComponent>
  }
}
2
3
4
5
6
# 操纵props
// 返回一个无状态的函数组件
function HOC(WrappedComponent) {
  const newProps = { type: 'HOC' };
  return props => <WrappedComponent {...props} {...newProps}/>;
}


// 返回一个有状态的 class 组件
function HOC(WrappedComponent) {
  return class extends React.Component {
    render() {
      const newProps = { type: 'HOC' };
      return <WrappedComponent {...this.props} {...newProps}/>;
    }
  };
}
2
3
4
5
6
7
8
9
10
11
12
13
14
15
16
# 抽象state
需要注意 ⚠️的是,通过属性代理方式实现的高阶组件无法直接操作原组件的 state,但是可以通过 props 和回调函数对 state 进行抽象。️
常见的例子是实现非受控组件到受控组件的转变:
// 高阶组件
function HOC(WrappedComponent) {
  return class extends React.Component {
    constructor(props) {
      super(props);
      this.state = {
        name: '',
      };
      this.onChange = this.onChange.bind(this);
    }

    onChange = (event) => {
      this.setState({
        name: event.target.value,
      })
    }

    render() {
      const newProps = {
        name: {
          value: this.state.name,
          onChange: this.onChange,
        },
      };
      return <WrappedComponent {...this.props} {...newProps} />;
    }
  };
}

// 使用
@HOC
class Example extends Component {
  render() {
    return <input name="name" {...this.props.name} />;
  }
}
2
3
4
5
6
7
8
9
10
11
12
13
14
15
16
17
18
19
20
21
22
23
24
25
26
27
28
29
30
31
32
33
34
35
36
# 获取ref引用
通过属性代理方式实现的高阶组件无法直接获取原组件的 refs 引用,但是可以通过在原组件的ref回调函数中父组件调用传入的 ref 回调函数来获取原组件的refs 引用。
# 继承方式的高阶组件
反向继承指的是使用一个函数接受一个组件作为参数传入,并返回一个继承了该传入组件的类组件,且在返回组件的 render() 方法中返回 super.render() 方法,最简单的实现如下:
作用:操纵props、操作生命周期函数
export default () => WrapperComponent => class A extends WrapperComponent {
    render () {
        const {user, ...otherProps} = this.props;
        this.props = otherProps;
        return super.render()
    }
}
2
3
4
5
6
7
相较于属性代理方式,使用反向继承方式实现的高阶组件的特点是允许高阶组件通过 this 访问到原组件,所以可以直接读取和操作原组件的 state/ref/生命周期方法。
反向继承方式实现的高阶组件可以通过 super.render() 方法获取到传入组件实例的 render 结果,所以可对传入组件进行渲染劫持(最大特点)
# 劫持原组件生命周期方法
因为反向继承方式实现的高阶组件返回的新组件是继承于传入组件,所以当新组件定义了同样的方法时,将会会覆盖父类(传入组件)的实例方法,如下面代码所示:
function HOC(WrappedComponent){
  // 继承了传入组件
  return class HOC extends WrappedComponent {
    // 注意:这里将重写 componentDidMount 方法
    componentDidMount(){
      ...
    }

    render(){
      //使用 super 调用传入组件的 render 方法
      return super.render();
    }
  }
}
2
3
4
5
6
7
8
9
10
11
12
13
14
虽然生命周期重写会被覆盖,但我们可以通过其他方式来劫持生命周期:
function HOC(WrappedComponent){
  const didMount = WrappedComponent.prototype.componentDidMount;

  // 继承了传入组件
  return class HOC extends WrappedComponent {
    componentDidMount(){
      // 劫持 WrappedComponent 组件的生命周期
      if (didMount) {
        didMount.apply(this);
      }
      ...
    }

    render(){
      //使用 super 调用传入组件的 render 方法
      return super.render();
    }
  }
}
2
3
4
5
6
7
8
9
10
11
12
13
14
15
16
17
18
19
# 读取/操作原组件的 state
反向继承方式实现的高阶组件中可以读取、编辑和删除传入组件实例中的 state,如下面代码所示:
function HOC(WrappedComponent){
  const didMount = WrappedComponent.prototype.componentDidMount;
  // 继承了传入组件
  return class HOC extends WrappedComponent {
    async componentDidMount(){
      if (didMount) {
        await didMount.apply(this);
      }
      // 将 state 中的 number 值修改成 2
      this.setState({ number: 2 });
    }

    render(){
      //使用 super 调用传入组件的 render 方法
      return super.render();
    }
  }
}
2
3
4
5
6
7
8
9
10
11
12
13
14
15
16
17
18
# 渲染劫持
条件渲染指的是我们可以根据部分参数去决定是否渲染组件(与属性代理方式类似),如:
const HOC = (WrappedComponent) =>
  class extends WrappedComponent {
    render() {
      if (this.props.isRender) {
        return super.render();
      } else {
        return <div>暂无数据</div>;
      }
    }
  }
2
3
4
5
6
7
8
9
10
我们还可以通过 React.cloneElement 方法修改由 render 方法输出的 React 组件树:
// 例子来源于《深入React技术栈》
function HigherOrderComponent(WrappedComponent) {
  return class extends WrappedComponent {
    render() {
      const tree = super.render();
      const newProps = {};
      if (tree && tree.type === 'input') {
        newProps.value = 'something here';
      }
      const props = {
        ...tree.props,
        ...newProps,
      };
      const newTree = React.cloneElement(tree, props, tree.props.children);
      return newTree;
    }
  };
}
2
3
4
5
6
7
8
9
10
11
12
13
14
15
16
17
18
# @16.4
- 增加
Pointer Events
# @16.6
# React.memo
React.memo(【函数组件】) ~ React.PureComponent 【memoization => 缓存】
# React.lazy
React.lazy(() => import【组件】)
# other
static contextTypestatic getDerivedStateFromError()- Suspense组件【悬念组件?】
- 废弃
React.StrictMode
# todo
- jsx
ReactDOM.render()React.Fragments- 组件(createReactClass,Component,SFC)、元素、实例
- createReactClass => mixins
- 时间处理(bind(this)) => bind、apply、call
- React.cloneElement(element, [props], [...children])
- 纯组件(SFC、函数式无状态组件
- 纯函数
- 受控组件、非受控组件
- propTypes
- 异步处理redux:redux-chunk、redux-saga